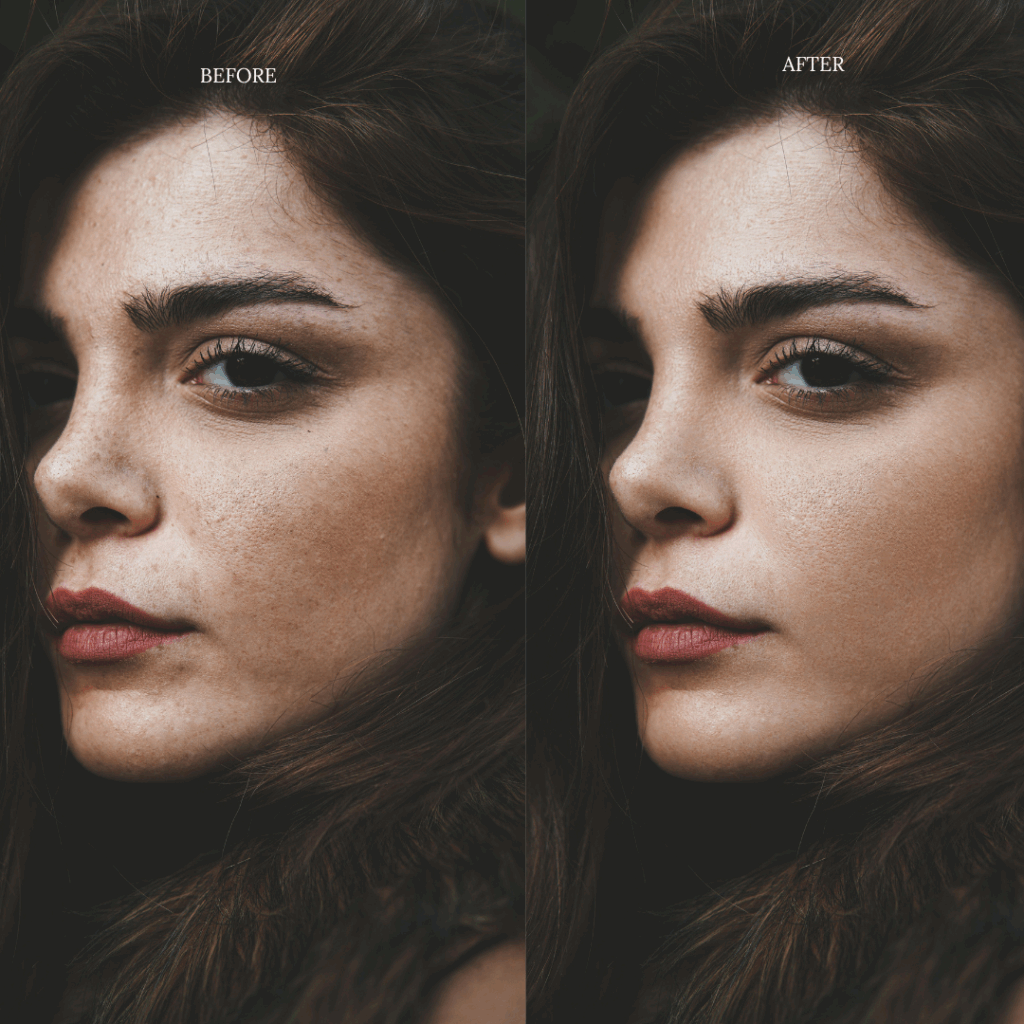
Frequency Separation Made Simple: Professional Skin Retouching in Photoshop
In this video, I will teach you, directly and without wasting time, how to use frequency separation in Photoshop for professional skin retouching.
This technique is widely used in beauty retouching, portrait editing, adult photo retouching, fashion photography, and professional photography workflows because it allows you to correct skin imperfections while preserving natural skin texture.
For more advanced Photoshop tutorials, beauty editing, adult retouching techniques, and professional photography workflows, subscribe to HUEB ARTS PRIVATE MEMBERSHIP.
What Is Frequency Separation?
Frequency separation is a Photoshop retouching technique that separates an image into two layers:
Color Layer
This layer controls tones, colors, transitions, shadows, and highlights.
Texture Layer
This layer preserves skin pores, fine details, texture, hair, and surface imperfections.
By separating color and texture, you can retouch the skin without making it look artificial, plastic, or overedited.
Step 1: Duplicate the Layer
First, duplicate the original image layer twice.
Use the shortcut:
Ctrl + J
Rename the first duplicated layer:
COLOR
Rename the second duplicated layer:
TEXTURE
The COLOR layer will be used to smooth tonal transitions, while the TEXTURE layer will preserve the natural details of the skin.
Step 2: Work on the Color Layer
Now, turn off the visibility of the TEXTURE layer and select the COLOR layer.
Go to:
Filter > Noise > Dust & Scratches
Adjust the value until the model’s skin tones become smoother, but the main facial structure is still recognizable.
In this example, a value around 27 works well.
The goal is not to blur the image completely. The goal is to soften the color transitions while keeping the overall shape of the face visible.
Step 3: Apply Image to the Texture Layer
Now, turn the TEXTURE layer back on and select it.
Go to:
Image > Apply Image
Use the COLOR layer as the source.
Set the blending mode to:
Subtract
Then use:
Scale: 2
Offset: 128
After applying these settings, change the blending mode of the TEXTURE layer to:
Linear Light
Now the image should look normal again, but the color and texture are separated into two different layers.
Step 4: Retouch the Texture
Select the TEXTURE layer.
Choose the Clone Stamp Tool.
Set the sample mode to:
Current Layer
Now, hold Alt and click on an area of clean skin texture that you want to use as a source.
Then carefully paint over the areas you want to correct.
This allows you to remove small imperfections while keeping the skin texture natural and realistic.
The Final Result
After just a few minutes of work, we now have a cleaner portrait with a natural texture, not an artificial one.
This is the real power of frequency separation in Photoshop. It gives you control over skin retouching while preserving the details that make the image feel real.
This technique is ideal for:
Beauty retouching
Portrait retouching
Fashion photography editing
Adult photo retouching
Professional skin retouching
Photoshop retouching workflows
High-end photography editing
Watch the Full Tutorial
In the full video, you can follow the entire process step by step and see how frequency separation can improve the final quality of a portrait without destroying the natural texture of the skin.
If you enjoyed this tutorial, leave a like and subscribe to the channel.
See you next time.
Private Creative Archive
Go Deeper Inside Hueb Arts Private Membership
Unlock private photo retouching videos, fine art editing workflows, Camera Raw presets, PDF manuals, visual studies and exclusive creative tools created for photographers, retouchers, visual artists and image creators.
- Private Photoshop retouching tutorials
- Fine art photography editing workflows
- Camera Raw presets and PDF manuals
- Exclusive visual studies and creative tools
Photo retouching, fine art editing and uncensored creative workflows.
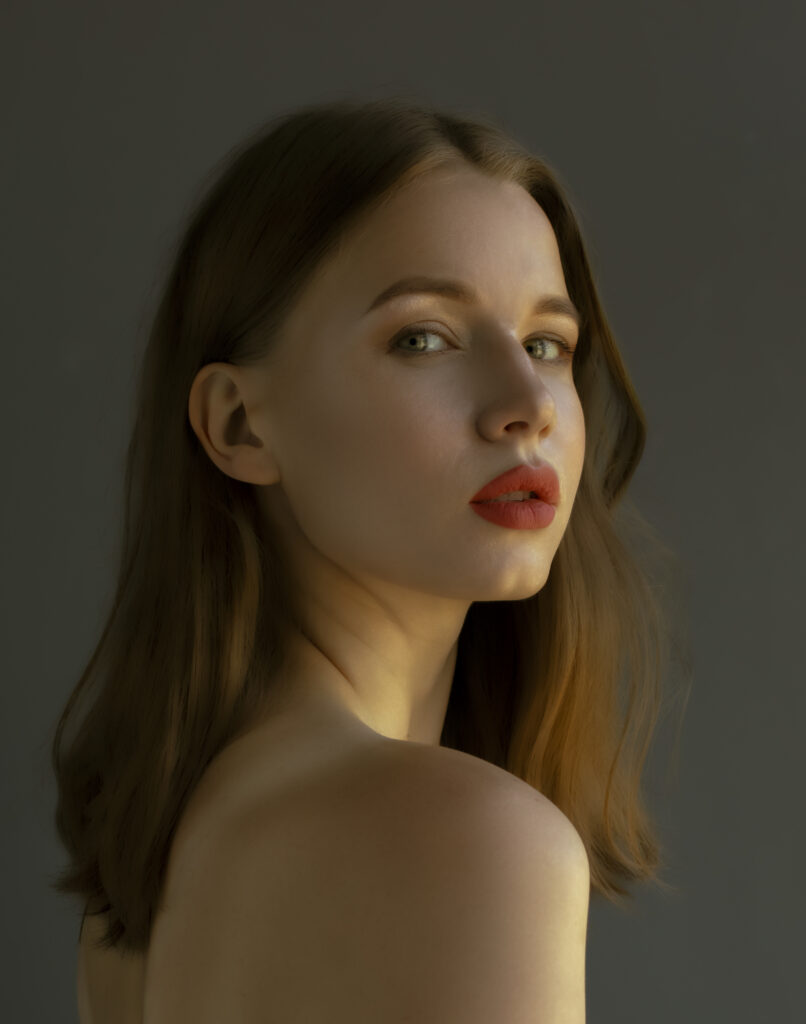
![Professional beauty retouching is not about changing a person. It is about controlling the visual language of the image. In this new free video on my Patreon, I show a complete Beauty Photoshop Retouch workflow focused on three essential elements: skin, light and color. These three decisions can completely change how a photograph is perceived. A sensual portrait can look amateur, flat or visually noisy when the skin texture is uncontrolled, the light has no direction and the color feels disconnected from the mood of the image. But when these elements are treated with precision, the photograph gains presence, elegance and impact. What You Will See in This Retouching Video In this Photoshop retouching session, I work on a beauty image with a sensual editorial atmosphere. The process focuses on refining the photograph without destroying its natural appeal. The video covers: Skin retouching with attention to texture, tone and visual cleanliness. Light control to improve dimension, highlights and facial structure. Color grading to create a more luxurious and polished beauty photography finish. The goal is to make the image feel more intentional, more refined and more visually powerful, while keeping the model recognizable and preserving the emotional quality of the original portrait. Why Skin Retouching Matters Skin is one of the first things the viewer notices in beauty photography, lingerie photography and sensual model portraits. Poor retouching can make the skin look plastic, artificial or lifeless. Professional skin retouching requires balance. The image must look polished, but still believable. Texture matters. Shadows matter. Small transitions between light and skin tone matter. In the video, I show how subtle adjustments can clean the image while maintaining a high-end photographic look. Light and Color Are What Create the Mood Many people think retouching is only about removing imperfections. That is a limited view. In professional photo editing, light and color are just as important as skin work. Light gives structure to the face and body. Color creates atmosphere, emotion and visual identity. A warmer tone can make the image feel more intimate. Stronger contrast can make it more cinematic. Controlled highlights can create a luxury beauty photography effect. The right color grading can turn a simple portrait into a more editorial and sensual image. Watch the Full Video for Free I made this video available for free on my Patreon so photographers, retouchers, models and beauty photography enthusiasts can see the full retouching process behind the final image. Watch the full free video here: [insert your Patreon link here] If you are interested in beauty Photoshop retouching, model retouching, sensual photoshoot editing, skin retouching, lingerie photo editing, glamour retouching or high-end portrait retouching, this video will show you how small technical decisions can create a much stronger final image.](https://felipehueb.com/wp-content/uploads/2026/05/beauty_photoshop_retouch_thumb_1280x720-290526-1024x576.png)